It’s hard to believe, but it’s already that time again–Nail Polish Sunday! Since I’ve been focusing on new colors a lot lately, this week I decided to go with a bit of nail art–caviar beads (aka microbeads).

This trend has been around for awhile, but it never quite became as popular as some of the other looks. Based on my experience, there are probably a few reasons for that…
Caveats for Caviar Nails:
- If you buy the beads in a kit or bottles specifically marketed as nail art supplies, they tend to be a bit expensive for the amount you get. That was a turn off for me for awhile–until I found out you can get the same microbeads at the craft supply store in greater quantity for less cost!
- While the actual application of the beads is super easy, this manicure is high maintenance. I’ve gotten them to last–at most–about two days before the beads shed like mad.
However, it’s still a really unique look, so if you want something to wear for a special occasion, caviar nails are a good option.
Since the beads tend to shed easily, I prefer to apply only to one nail as an accent rather than to all ten. Most of the time, people tend to paint their index fingernail as the accent, but I would recommend not doing that for this type of manicure. If you’re like me and you use your index fingernail like a Swiss army knife, you’ll just end up knocking the beads off even faster than normal. So, I chose to make my accent nail the ring finger on each hand.
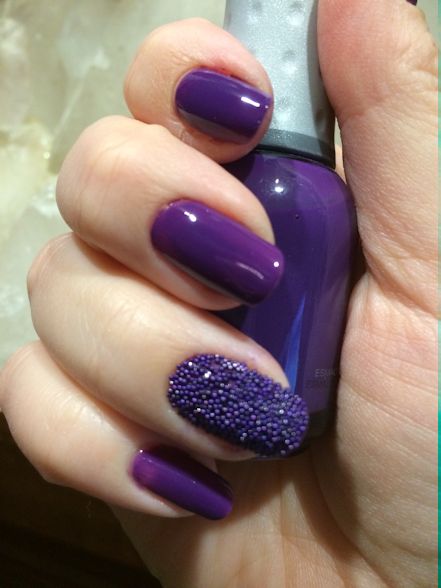
The first step is to apply the base coat and nail color as normal. I’ve chosen Orly Charged Up, which is a deep purple creme.

When you’re ready for top coat, that’s when you want to add the microbeads. I use a slightly thicker than normal layer of top coat. Before you get into the beads, be sure you put something underneath first to catch them! Pour the beads over top of the nail as quickly as possible after application of the top coat. They should stick immediately. Gently tap them down to secure them in place (you won’t need to press hard at all) and then you’re done. Don’t bother topping the beads with top coat–it distracts from the texture and only makes them peel off in one big layer.
Here’s the final appearance:
In two weeks, the easiest French manicure you’ll ever do, courtesy of Femme Fatal Love Potion!


I love the texture!
LikeLiked by 1 person
Me too! Depending on the colors of beads you use, you can get a more matte look or a more metallic look too. It’s amazing how much more texture is visible with the metallic beads.
LikeLike